If you’ve been working with Docker for a bit, you’ve probably been pulling existing images and running containers off them. That works fine until it doesn’t — and the moment your project has specific runtime requirements that no existing image satisfies, you need to know how to build your own. That’s where the Dockerfile comes in.
What is a Dockerfile?
A Dockerfile is simply a text file that defines a Docker image. It’s a step-by-step set of instructions that tells Docker exactly how to build your custom environment. When you run docker build, Docker reads this file top to bottom and executes each instruction in sequence to produce your image.
Think of it this way: if a Docker image is the blueprint for your container, the Dockerfile is how you write that blueprint from scratch.
Breaking Down the Dockerfile Instructions
Let’s go through each instruction you’ll encounter and what it actually does.
FROM is always the first line in any Dockerfile, and it has to be. Every image needs a starting point, and this instruction defines it. That starting point can be an existing image pulled from a Docker registry, or if you truly want to start from nothing, you can build from scratch. In most real-world cases, you’ll be starting from an existing base image like Ubuntu, Alpine, or a language-specific image like Node or Python.
RUN executes a command during the image build process and waits for it to finish before moving on. You’ll use this for things like installing dependencies, setting up packages, or running any setup script your application needs.
WORKDIR sets the working directory inside the image. It’s good practice to define this early in your Dockerfile because it keeps things organized and ensures subsequent instructions operate from the right location. Think of it as doing a cd into a folder and staying there for the rest of the build.
COPY does exactly what it sounds like: it copies files from your local machine into the image. This is typically how your application source code gets into the container.
ENV lets you set environment variables inside the container. These are key-value pairs that your application can read at runtime, making it a clean way to handle configuration without hardcoding values into your code.
EXPOSE is how you tell Docker which port your application is listening on. If your app needs to be reachable from outside the container, you must declare that port here. It doesn’t automatically publish the port, but it documents the intent and works in conjunction with the -p flag when you run the container.
CMD is the final instruction in most Dockerfiles, and it specifies how your application should be started when the container runs. Whatever command you’d normally use locally to launch your app goes here, along with all its arguments. It’s worth noting that CMD can be overridden at runtime, which is where the next instruction comes in.
ENTRYPOINT gives you more control over how the container starts compared to CMD. While CMD can be easily overridden, ENTRYPOINT is more rigid and better suited when you want the container to always run a specific executable regardless of the arguments passed at runtime. In practice, both are often used together for maximum flexibility.
LABEL adds metadata to your image in the form of key-value pairs. It’s an organizational tool more than anything else — a common use is specifying a maintainer field to document who is responsible for the Dockerfile. It doesn’t affect how the image runs, but it’s good practice to include relevant labels for documentation purposes.
Docker Image Commands You Need to Know
Once you understand how to write a Dockerfile, the next step is to get comfortable managing the images you build and pull. Here’s a rundown of the essential commands.
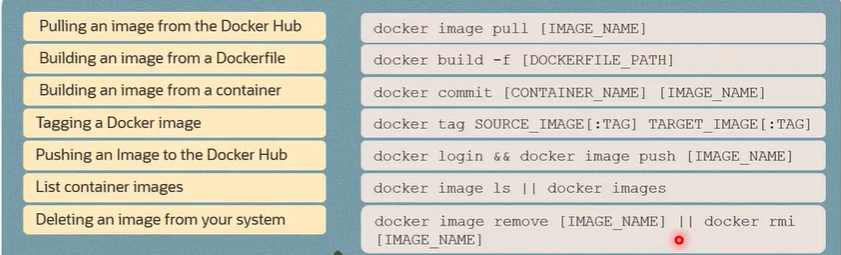
Pulling an image from Docker Hub is done with docker image pull followed by the image name. This downloads the image to your local machine so you can use it.
Building an image from a Dockerfile uses docker build with the path to where your Dockerfile lives. This is the command that reads your Dockerfile and produces a usable image from it.
Building an image from a running container is possible with docker commit. You provide the container name or ID along with the name you want to give the new image. This is useful when you’ve made changes inside a running container and want to capture that state as a new image.
Tagging an image is done with docker tag, where you specify the source image and the target tag format. Tagging is important for versioning and for pushing images to registries in an organized way.
Pushing an image to Docker Hub is a two-step process. First, you log into your Docker Hub account. Then you use docker image push followed by the image name to upload it from your local repository to the registry. From there, it’s accessible to anyone with the right permissions.
Listing your local images can be done with either docker image list or the shorthand docker images. Both give you a view of all images currently stored on your machine.
Removing an image uses either docker image remove or docker rmi, with the image name as the argument. Use this to clean up images you no longer need and free up disk space.
Dockerfiles are where Docker goes from a convenient tool to a genuinely powerful one. Once you can define your own images, you’re no longer constrained by what’s available publicly. You control the environment completely, which means fewer “works on my machine” problems and much more predictable deployments across every stage of your pipeline.


Recent Comments