If you’re getting into DevOps or just trying to wrap your head around modern application deployment, Docker is one of those things you simply cannot afford to skip. Let me walk you through how it works: the architecture, how it compares to virtual machines, and the commands you’ll be using day to day.
The Docker Architecture: How It All Fits Together
Docker isn’t just one thing running in the background. It’s a collection of components that work together, and understanding each one makes the whole picture a lot clearer.
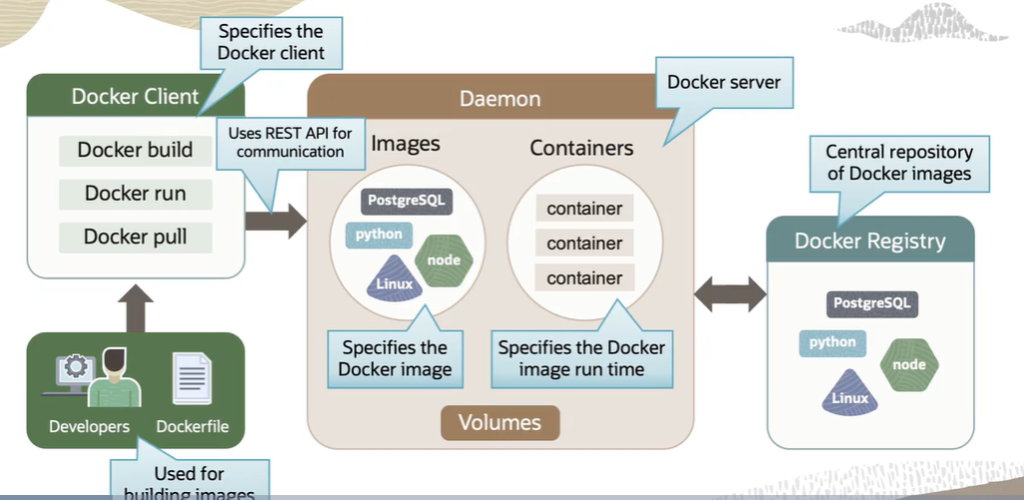
The Docker Client is your point of contact with Docker. As a developer or DevOps professional, every command you fire goes through the Docker client first. It can run on the same machine as your Docker engine, which is typical in development environments, or connect to a remote host. Either way, the client takes your commands and sends them to the Docker Daemon via REST APIs. One thing worth knowing: a single Docker client can communicate with more than one Daemon at a time.
The Docker Daemon is the engine running quietly in the background. It’s a persistent process that manages everything: images, containers, networks, and storage volumes. It constantly listens for API requests coming from the client and acts on them. Think of the client as the person giving orders and the Daemon as the one actually doing the work.
Docker Registries are where images live. When you need an image, you pull it from a registry. When you build one, you push it there for storage. Public registries like Docker Hub and Docker Cloud are the most commonly used, but you can also set up private registries for your organization. If you’re working on Oracle Cloud Infrastructure, their container registry service, OCIR, lets you host both public and private registries within their ecosystem.
Containers vs. Virtual Machines: Understanding the Real Difference
This is probably the most important conceptual distinction to get right, so let me break it down properly.
Virtual machines work by placing a hypervisor, a layer of software, firmware, or hardware, between your physical server and the virtualized environments running on top of it. Each virtual machine gets its own full guest operating system. You can run a Linux VM right alongside a Windows VM on the same physical server. Each one comes with its own binaries, libraries, and applications. That independence is powerful, but it comes at a cost. VMs can easily reach gigabytes in size, and that overhead adds up quickly across memory, storage, and the entire software development lifecycle. Portability between cloud providers and on-premise data centers also becomes a real pain point.
Containers take a fundamentally different approach. Instead of virtualizing the hardware, containers sit on top of the physical server and its host operating system, typically Linux or Windows, and share the OS kernel. They also share binaries and libraries in most cases, though those shared components are read-only. Because you’re not reproducing an entire operating system for every workload, containers are dramatically lighter. We’re talking megabytes versus gigabytes, and startup times measured in seconds rather than minutes.
In practical terms, this means you can comfortably run two to three times more applications on a single server using containers than you could with virtual machines. That’s not a small difference. That’s a fundamental shift in how efficiently you’re using your infrastructure.
That said, virtual machines still have their place. If your application specifically requires its own operating system, or if security isolation is your absolute top priority, a VM is the right tool. But for the vast majority of modern application workloads, containers give you a lighter, faster, and more cost-effective solution.
The Docker Commands You’ll Use Every Day
Theory is great, but Docker is ultimately a hands-on tool. Here are the commands you’ll reach for constantly once you start working with it.
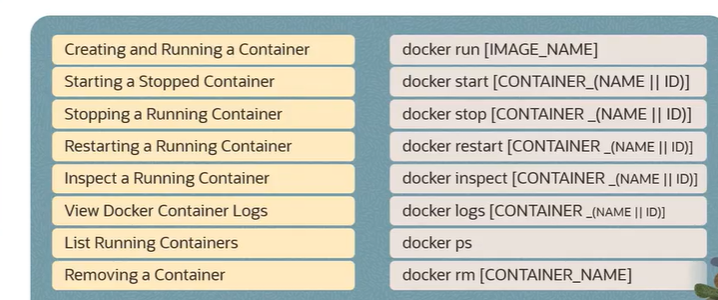
Creating and running a container is done with docker run followed by the image name. You can attach parameters to customize the behavior: -p to map ports, -d to run the container in detached mode so it runs in the background without tying up your terminal, and several others depending on your use case.
Starting a stopped container uses docker start either the container name or its ID. Straightforward. If something was stopped and you need it back up, this is your command.
Stopping a running container is docker stop followed by the container name or ID. Clean, graceful shutdown.
Restarting a container is docker restart with the container name or ID. Useful when you’ve made configuration changes and need a fresh start without going through a full stop-start cycle manually.
Inspecting a container is where you go when you need details, such as network settings, environment variables, mounted volumes, and more. The command is docker inspect followed by the container name or ID, and it outputs a thorough JSON breakdown of everything about that container.
Viewing container logs is done by the container identifier. Essential for debugging. If something isn’t behaving the way you expect, this is usually your first stop.
Listing running containers uses docker ps. If you want to see everything, running and stopped containers both, add the -a flag: docker ps -a. This gives you the full picture of what’s on your system.
Removing a container is docker rm with the container name or ID. Once a container has served its purpose, this is how you clean it up.
That covers the foundational layer of Docker: the architecture that powers it, a clear-eyed comparison with virtual machines, and the core commands that will become second nature once you start using it regularly. Once these concepts click, everything else you learn about Docker, networking, volumes, Docker Compose, and orchestration with Kubernetes will build on this foundation naturally.


Recent Comments